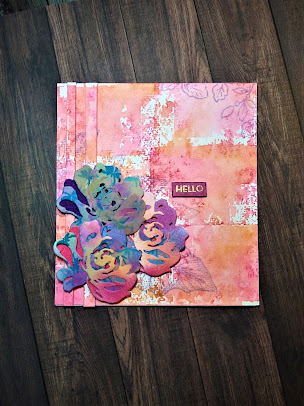
Hello my crafty peeps!! Yes, I am back with another and my final card project for Level 1 of the Altenew AECP program!!! I am so excited, honored and proud to have come this far and learned so much. I really wanted this card to express my happiness for coming this far. You guys know I love bright colors and lots of them lol...well, this project showcases pretty much ALL the colors but in some pretty sweet ways. Lets take a look!
First of all, I am now addicted to block printing with my acrylic block. Yes, the same acrylic block you use for stamping you can print with. When I first practiced this technique, I unknowingly used the side of the block with the lines carved into it (for lining up your stamps). At first I was like BUMMER! But, then the level of texture it added to the piece grew on me so I block printed an entire panel of cold press watercolor 140lb paper that fit the front of this Classic Crest Solar White 80lb cardstock base. Now, this card base is not a standard size. I initially cut it to create a tent fold card, but after creating the gorgeous background, I decided to go in a completely different direction as far as finishing and embellishing went. So, now it's an odd shaped card which will get the benefit of a custom made envelope in the future-so not a total loss. Ok, lets get back to that block printing color :)
I have the 2"x3" Altenew acrylic block for stamping, so on the bottom of it (the side with the lines etched into it) I applied Altenew crisp dye inks in the following colors-applying the ink pads directly to the block, and using the colors randomly: Ruby Red, Orange Cream, Canyon Clay and Cotton Candy. The front of this card used 6 printings of the block. For each printing, after applying the ink, I spritzed the ink with water flipped the block over and stamped it to the card front. Then I wiped the block clean and re-inked, spritzed, and continued the process. The prints did not line up exactly, and overlapped in some areas which just created more texture on this piece. I set the piece aside to dry and focused on the embellishments, which are 3D flowers created with the Altenew Fantasy Florals die set. Now, I actually have a stash of these flowers ready to go at my craft table, sorted by their layers (this die set creates three layers of each flower) Here's my secret to getting the depth and color into the layers of these flowers: I will take scraps of the Classic Crest cardstock and blend out solid ink colors onto. I'll blend darks into lights and vice versa and let them overlap. Over the lighter areas of ink I will used foam daubers to apply contrasting and coordinating swipes of color. Finally I will take a random stamp in a completely non-matching color and stamp all over some of the blended areas.
The stamp really doesn't matter because in the end this cardstock is going to get cut up so you won't be able to tell what the stamp design was. I then will take the base layer die first and place it around on the cardstock until I find a darker shaded area that looks good. I will tape the die down to this area with low tack tape/washi tape, cut it off the cardstock and set it aside to be die cut. Next I take the middle layer die and move that around the cardstock until I find some really cool mid-level pigmented colors, choosing areas where colors overlap. I tape this die down and cut it off the cardstock also. Then I take the third layer die which is like the highlight layer of the flower, and find the lighter areas of the cardstock. I tape it down, cut it off the cardstock and then run these cut layers through my die cutting machine. I use double sided foam tape trimmed to fit the petal areas to create the 3D effect between the layers. This is such an easy and effective technique and probably my most favourite. I even have some layers cut from colored vellum to give some depth to the colorful layers.
I absolutely love this card and the techniques I used from the class, to make it!! I have so many different ideas for this technique now. I hope you try this block printing technique. It's a great technique to bring you out of your comfort zone. Please leave me a comment, let me know what you think, and share a photo if you try this technique as well!! Until next time, have fun!!


.jpeg)

Your flowers look beautiful!! Thank you for submitting your work to the AECP assignment gallery.
ReplyDelete