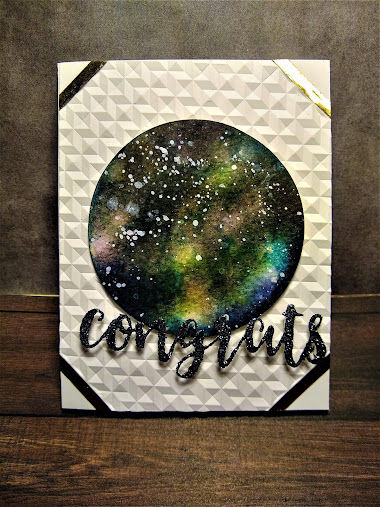
Hi my crafty peeps! Yes, I am back already with another project for the AECP Altenew Educator Certification Program. I really had fun with this one! This is my take on a masculine card. And what was my inspiration you ask?? Why, glitter of course! lol, Why not? I love to sparkle and shine, and crafting is really us putting a little of ourselves into our projects, right? Now, while I love glitter and was inspired by it for this project, I also was fully aware that I needed to add mostly elements that would be pleasing to a masculine eye. For example: geometric shapes, metallics, basic shapes and some boldness. Well, here's what I came up with, I hope you like it and I hope it inspires you to incorporate a little of yourself into all your projects, those inside and outside of your comfort zone.
This is a standard A2 card. The base is cut from Altenew Classic Crest Solar White 80lb cardstock. I folded this and set this aside. Next I cut a face panel for the card measuring 5 1/2"x4 1/4" from the same cardstock. This layer will lay flat, covering the entire face of the card. Then I grabbed some scraps of 140lb cold pressed watercolor paper. From one scrap I cut a circle; large enough to make a bold impact, but still small enough to show the card face around it. The other scrap of watercolor paper I cut the word "celebrate" using the Altenew Script die. I set these two elements aside. Taking the panel for the face of the card, I laid it on a diagonal inside the Altenew Angled Mosaic 3D embossing folder. I made sure that each corner of the panel was sticking out evenly from each side of the folder. Then I ran it through my embossing machine. Wow!! The depth of design from this folder gave the paper almost a metallic look. Perfect for my masculine theme. I then took Altenew thin gold washi tape and taped the lines where the un-embossed corners met the embossing. Now I have lots of geometry, metallics....next comes the bold!
My goal for the cut circle was to make a galaxy. I applied the following Altenew Crisp Dye inks, in this order, with a foam dauber using circular motions: Warm Sunshine, Orange Cream, Lagoon, Deep Iris, Starlight. Then I went nearly over all the colors, lightly, with Permanent Black. At this point I spritzed the circle, letting the water pool with the ink. Then I blotted it with paper towel. I went back with the black and smudged all over with it. I spritzed it again and smeared it around with a wet paintbrush. I used my heat gun, first heating the bottom of the paper to help prevent warping, then heating the top of the paper but staying about 6" away-I just wanted the air to dry it, not the heat to do any damage. Lastly I went around again smudging the black into the colors and then running around the edge of the circle with the black pad to finish the edges. To add stars I watered down some pure white acrylic paint. I put some on my pallet and mixed it roughly with two parts water. I used a thick paintbrush to pick up the colored liquid and splattered it all over the circle. I used my heat gun to dry it. I added thick, double sided sticky foam to the back of the whole circle and stuck it down in the center of the embossed panel. Now, on to the sentiment.
I knew I just had to add glitter to this. I chose an ebony and hematite colored extra fine glitter. When I add glitter to projects, I like to add a couple tones of glitter to give depth. Taking the cut out sentiment, I flipped it upside down and ran it thru my 1 1/2" Xyron sticker maker. This puts the adhesive on the front of the sentiment and makes applying glitter a dream. But, before I sprinkled the glitter, I used a toothpick to wipe out any adhesive stringers that are on the letters. After sprinkling on both glitters, I flipped the sentiment over and used extra thick double sided foam adhesive squares, cut to fit the scrollwork of the sentiment. I wanted the sentiment to stick up above the galaxy, that's why I chose the extra thick foam. You could also just layer up foams to get the height if you can't find the extra thick. I adhered the sentiment at the bottom of the galaxy and that was it.
I almost felt like I was doing a boutique card while I was making this project. It's elegant, but not fussy. I would call it streamlined, to use a more masculine description. I ran it by my husband and he loved it, so I consider that a success!
Thank you for hanging out with me for this project, I hope it inspired you! If you try any of these techniques, please leave me a comment and let me know all about it! Stay tuned, more projects will be coming, and I can't wait to show them to you!!


.jpeg)

I love that galaxy die-cut! Looks beautiful. Thank you for submitting your wonderful work to the AECP assignment gallery.
ReplyDeleteThanks! The last galaxy art I did was on my nails lol!
Delete