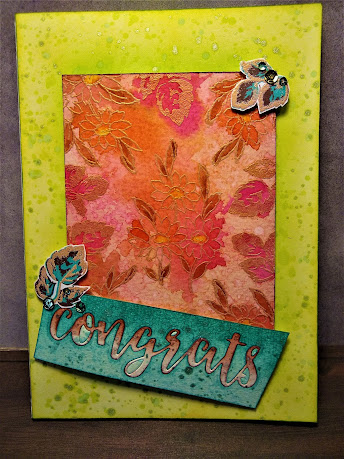
This is a 5" x 7" card base cut from Altenew Classic Crest Solar White 80lb cardstock. I will be adhering a 5" x 7" panel of cold press water color 140lb paper directly to the front of the card base after it's been colored.
Since bright green color was my inspiration for this project, I chose Altenew Crisp Dye inks in Fresh Leaf and Limeade. Taking the 5"x7" water color paper panel, I started blending from the center of the panel out towards the sides with Fresh leaf, using a felt applicator. I knew I wanted a raised, panel in the center of this one, with this ink to create a sort of shadow frame for it so I blended out, stopping at about an inch from each side of the edge of the panel. Next, using a foam aplicator I blended Limeade ink from the edge of the panel in towards the Fresh Leaf I had just applied in the middle. I kept this blending soft and then came in with Altenew Crisp Dye ink in Mango Smoothie and very, very lightly blended the Fresh Leaf and Limeade together. To finish this panel I smeared some of the greens on a pallet and, with water and a thick paint brush I splattered the two greens onto the panel. I let these dry, then, for a touch of fun I smeared Altenew Crisp Dye ink in Lagoon onto my pallet then sqeezed some glitter solution from a Wink of Stella pen into it. Mixing this with alcohol I have in a water brush, I then splattered it across the panel. The finishing touch for this panel was to run the Fresh Leaf along the very side edges of the panel to give it a clean finished look.
I set this panel aside to dry and cut a smaller panel from the water color paper, measuring 3 1/2" x4 3/4". This will be the raised panel in the center of the card face. I wanted to use a loose watercolor technique accented by embossed images. I used the Mini Daisy stamp from Altenew and embossed the image to the panel in Altenew "Golden Peach" embossing powder. I first stamped the image in the center of the panel, then stamped it in each corner. Next I took the layering leaf stamps from the Altenew stamp set "Vintage Flowers" and added leaves around the edge of the panel between the daisies. Again, embossed these with the Golden Peach embossing powder. For the colors of this panel I chose Altenew Crisp Dye inks in Ruby Red, Burnt Red, Mahogany Bark and Pastel Sunrise. Using blending brushes I softly blended the colors randomly onto the panel and into each other. Next, I took each ink and smeared it on my pallet, leaving room between them. Using my spritzing bottle, I spritzed the panel with water, just a few shots so as not to over saturate it. To this I began loosely coloring the images with the inks, watered down, from my pallet. After adding a bit of color, I used my heat gun to warm the backside of the panel to help prevent warping, and heated the front side, keeping the gun about 6 inches away from the paper. When it was dry, I went back again with less wet inks on my brush and added a bit more color, focusing on specific areas like the flower faces and the leaves. I dried this again in the same way as before and to finish it I used the Mahogany Bark Ink to run along the edge of the panel. I set this aside to work on the sentiment.
The final touch for this card was to stamp and emboss leaves and add some sequence to pull the colors together. I used a generous amount of double sided sticky tape to adhere the 5"x7" panel to the card face. Then I used double sited sticky foam tape to attach the small panel. I adhered the sentiment at a fun angle bridging the two panels together and added one leafy sequence cluster to the top left corner of the sentiment and another to the opposite corner at the top of the center panel.
This card made me so happy while I was making it because of the colors!! Remember, if you have a favourite color but don't know what to do with it, get out your color wheel. It is the best tool in your crafting arsenal. I hope you like this project and I hope you share it, leave me a comment and let me know if you try any of the techniques I used. Thank you for hanging out with me, and I'll see you soon with another "Scrappy" project!


.jpeg)

WOW! That is one colourful card!! Thank you for sharing your wonderful work with us and submitting it to the AECP assignment gallery.
ReplyDelete