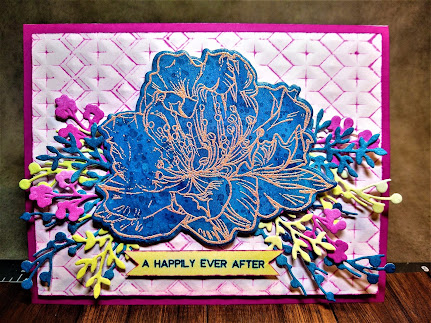
I used Classic Crest Solar White 80lb cardstock to make the A2(5 1/2" x 4 1/4") card base. It's a standard card fold but I used it as a landscape card for the design. This card has a lot of inking so all the parts of this project are made from the same cardstock. When I'm doing a lot of inking I love to use bright white cardstock to get the most color saturation out of the ink pigments. Using the cube ink of Altenew Crisp Dye ink in Magenta I ran the ink pad all around the perimeter of the card face. I wanted the deepest pigment of this ink I could get and nothing gets deeper into the fibers of cardstock than saturating them with the ink pad itself. I wanted to carry the deep magenta color throughout this card, but I didn't want to drown the card. I also wanted to add some subtle texture so I chose Altenew 3D embossing folder in Angled Mosaic. Now, here's the thing about embossing folders: there is the "emboss" side and the "de-boss" side, meaning, when you open the folder, the bottom has the designs that push up thru the paper fibers and into the recessed areas on the top of the folder. I took the Magenta ink and rubbed the ink pad all over the bottom, or "de-bossing" side of the folder, then placed an A2 size cardstock panel in it and ran it thru my embossing machine. This gave me an amazing geometric pattern outlined in the magenta. This is a great technique for geometric or patterned embossing folders. I cut this panel down to 5 1/4" 4" and set it aside.
Next I needed to incorporate the blue from the inspiration piece colors. I knew I wanted a big bold flower as the statement of this card, so of course that meant a die-cut. Now, the trick for getting a great die-cut without any white edges remaining on it after you cut it, is to first color an area of the cardstock you are going to cut it out from, larger than the stamp itself. This way, when you cut out your image, if there is any overhang from the die-cut, it will be filled in with the color of your background. So, using some cold press 140lb watercolor paper I first spritzed it all over with water, then smeared in dark blue and purple from my set of Altenew 12 color watercolors. I just kept smearing the colors together, letting them dry, then adding more, letting it dry and on the third round I added some Altenew Crisp Dye ink in Starlight with a wet paintbrush, smearing it into the blue and purple watercolor paints. Letting this dry, I then splattered the panel with watered down Starlight ink. I let that dry and then gave the whole area a wash of clear iridescent watercolor paint. I chose the wider of the two flowers from the Engagement Wishes stamp set. I used an embossing buddy to wipe down the surface of the painted cardstock for any static. I use Versamark for my embossing so I got the stamp really juicy with it. I still had some leftover Altenew Golden Peach embossing powder to which I had added Stickles glitter to for a different project, so I used that for this flower. I heat-set the powder with my heat gun then set the piece aside. Next, I finally got to pull out the Altenew Branches and Berries die set! On a scrap of the solar white cardstock I applied three swatches of ink colors using foam daubers: one in Starlight, one in the Magenta and one in Limeade. I randomly placed the branch dies on the colors and cut out a whole bunch of colorful branches. Better to have too many than not enough, and of course, the extras won't go to waste with future projects!
For the sentiment I used a foam dauber to apply the Limeade ink onto a scrap of the solar white cardstock then stamped it with a sentiment from the "Engagement Wishes" stamp set in the Starlight ink. Then I edged it with the Magenta.
To assemble the card, I took the de-bossed ink panel and ran the Magenta ink pad around it's edges to finish it off. I used wide double sided foam sticky tape to adhere it to the card face, centering it to show off the yummy deep pink boarder. I used the same double sided foam tape to adhere the flower to the front. Next, I gushed out a small puddle of Tombow liquid ink onto my silicone craft mat. Using tweezers to hold the branches, I dipped their stems into the glue puddle and stuck them under the big blue flower, randomly adding them to each side of it. Finally I added the double sided foam tape to the sentiment and attached that under the big blue flower.
I loved making this card! As artists or crafters, we owe it to ourselves to push our own limits and try new things and with this pink as part of the inspiration piece and also as my favourite color, it was easy to let my imagination run wild. I hope you enjoyed this project, and I hope you try some of the techniques I mentioned. If you do, please let me know! Thanks for stopping by, and I'll see you soon with another Scrappy project!


.jpeg)

Comments
Post a Comment